banner


Thursday, November 25, 2010

Happy Thanksgiving Free Quilling Patterns

Happy Thanksgiving may you have a happy and healthy holdiay!  I would like to take this opportunity to extend a special Thank You to everyone who has stopped by to check out the postings over the years.  This photograph was taken in October while we were pumkin picking, but I just loved the colors, don't you?

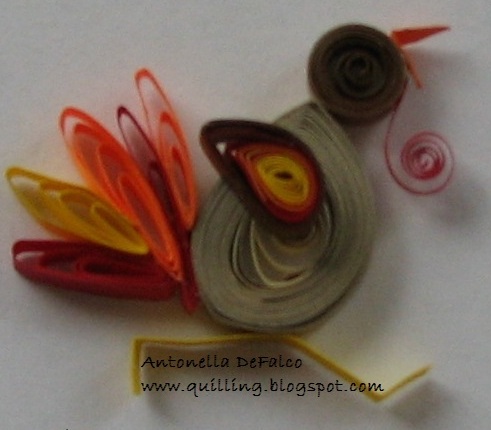
Here are two Turkey Patterns for you this day:


I used full-length strips, in this case they were 24 inch (60.96 cm) strips. You can use any manufacturer and they don't have to be this long.


For the Turkey's body and curled "feather" tail:

* 10 - 24 inch (60.96 cm) strips, rolled into a tight coil. Roll all strips together. I took the strips and slightly offset them to make it easier to start the coil.Do not roll all the way to the end of the strips. Leave approximately 6 in (15.24 cm) free.

* Glue all the strips at this point to keep the body tightly coiled while leaving the ends loose.

* Take the free ends and create loose open coils, coiling them in different directions as the "feathers" of your turkey.

For the head:

* 1 - 12 in (30.48 cm) brown teardrop for the head

* 1 - 6 in (15.24 cm) black triangle for the beak

* 1 - 6 in (15.34 cm) modified red teardrop, with a dangling spiral. This is made by curling the first half of the strip into a teardrop and glueing it where you pinch it to make the teardrop. Then take the remaining strip and create a spiral. This is for the fleshy carbuncle that hangs from the beak, called a snood.

To make the eye:

* Take Black, White, and Black strips glued together and roll together to make the eye.  You may alternately use one of those google eyes / wiggle eyes that you use on kids crafts.


Body:


* 2 strips of brown

* 1/2 strip of cream

* I let my strips overlap so that there is very little cream showing only in the center

* Make a teardrop shape

Head:

* 12 in (30.5 cm) tight coil

* Cut small triangle for beak

* Approximately 1 in (2.5 cm) of 1/16 in ( cm) wide paper for the red wattle (this is the part that hangs down from the beak)

Tail Feathers:

* 6 in (15.2 cm) Alternate side looping in various fall colors

* Attach to bottom of teardrop

Wing:

* 4 in (10.2 cm) Yellow, 6 in (15.2 cm) Red, and 12 in (30.5 cm) Brown strips - glue them end-to-end and make a shaped teardrop

* Attach to center of body

Feet:

* Scrap of Yellow

Looks like he is running away - "Don't eat me!"
 
Please share some of your thoughts and hopes about the holidays, or if you would like me to try to create a special tutorial just for you....

P.S. - Yes, you do recognize these tutorials, I guess I re-gifted :-)  Actually, my hubby was worried I would forget to finish cooking.  Stay tuned for some fresh, new tutorials for December.

Enjoy! Copyright for Personal Use Antonella DeFalco

Sunday, November 21, 2010

Happy Birthday Explosion Box

explosion box birthday gift card holder
Isn't this a cute way to deliver a Birthday Gift Card? I was doing my weekly round of the blogs that I follow and I found this post on the CraftiBlog, where she placed treats inside of an Explosion box... So, I used this for my inspiration to create a Gift Card Explosion box.

We are going to a Birthday Party and I wanted a new way to deliver a gift card to the birthday boy, and this was fit the bill perfectly.  I followed the instructions found here to create this little box.  Note: It is a very small box, a standard gift card fits inside when it is at an ever so slight angle because the box measures 2-1/2" all around.

My base started as a 7-1/2" square and the paper itself is glitter paper from the DCWV Bon Voyae Travel cardstock stack.  The top is 4-1/4" square from the K and company ancestry.com Designer Paper pad.  The inside of the explosion are 2-1/4" squares cut from a DCWV mini stack that I have.

This is the decorated inside of the base of the box. Since this is for a birthday, I selected the birthday base.  I could have stamped, but I chose to use paper instead.
 This is the glittery outside of the base of the box.  Note, when I make another one of these, I will try to keep the glitter for the lid instead of the base because this paper is difficult to fold.
 This is the top of the box, you can see the ribbon that I used.  To attach the ribbon, I cut a square, slightly smaller than the top of the box and punched 2 holes using a standard hole punch.  I then pulled the ribbon (from Michaels) through the holes and used the extra length to wrap around the box and tied a knot on the side.
 This is how the gift card nestles inside the box, ready to explode.

I'd love to hear from you if this inspires you to create one of these. I'd love to see your creation.

This was a lot of fun to make, and I hope that the recipient enjoys their gift.

UPDATE: I am entering this in the Make It Monday Linky Party

Enjoy! Copyright for Personal Use Antonella DeFalco

Giveaway Tilda Magnolia Stamp

Hello Everyone,

My dear friend Regina has a wonderful giveaway on her blog, a Tilda Magnolia Stamp and a Floral and Stone Spellbinders.  All you have to do is leave her a comment, if you have a blog please post about it and include a link back to the actual giveaway, click here.


This is her Christmas gift to us.  She will pick one lucky winner on December 10th.

These are great additions for any crafters assorment.

Good Luck!
Antonella :-)

Friday, November 05, 2010

Make It Monday, Anything Goes, Remember Remember and some Blog Candy


I have decided to join a few challenges this week. I have cheated a bit and have picked a project that I did a while ago. This is something that is near and dear to my heart, it is a memorial page I made in memory of my Mom.

She was the most beautiful person, she will always be remembered as a loving, caring person. She taught us that there is always room in our heart to help someone and to love one more. Your heart continues to grow and knows no boundaries. It has been 6 years and I still miss her. With the holidays approaching, I guess I am a bit sentimental.

The poem on this page is one that I wrote myself, I am including a PDF with all the pieces if you decide you want to try this layout yourself. I primarily used Scriptina because when printed on vellum and transparencies it is barely visible. I also used Merced on the poem.

You will also note that I have a wee-bit of quilling on this layout. I was looking through the album and the quilling has weathered being in a scrapbook that is not always right side up very well which makes me happy!

I love quotes and will spend hours looking for just the right one. For the mini album, I put a photo of my mom and the following quote “Live so that people on Earth will be sorry to lose you, but the Angels will be glad to welcome you in heaven.” (sorry, I don’t remember who it is from and I didn’t find it in a quick search – if you know, let me know and I will make the update)

I have a PDF with the poem and background, click here to retrieve it.

Make It Monday – Inspiration Challenge - http://michelle-pinkpaperparadise.blogspot.com/

Anything Goes - Lexis Creations Challenge #26: http://lexiscreations.blogspot.com/2010/11/lexis-creations-challenge-26-winners-of.html

Remember Remember - Ooh La La Creations Challenge #66: http://ooh-la-la-creationschallenges.blogspot.com/2010/11/challenge-66.html (I thought this was fitting, given the page I made)

I also found this fantastic new blog, and she is offering a great giveaway for her Birthday… Barbara's World og Whimcees http://whimcees.blogspot.com/

Please take the time to pop on over to these great challenges.

I hope you have enjoyed this project.

Enjoy! Copyright for Personal Use Antonella DeFalco

Wednesday, November 03, 2010

Blog Candy Giveaway

I sat down tonight to catch up on some of my favorite blogs and I ended up traveling around and found this new place to add to my list, Angelwoods Crafting Corner

She has a great giveaway for her Birthday this month... Why not stop by and check out some of her great ideas and enter for a chance to win too!


Hugs,
Antonella :-)

LinkWithin

Related Posts with Thumbnails